Fall recovery is an important skill to teach our occupational therapy patients. How many times have we seen the commercial and heard, “help, I’ve fallen and I can’t get up!”
Many times for older adults, falling is not about if it happens but rather about when it happens. Per the CDC, more than one out of four older adults fall each year.
Whether it’s due to age, injury, or disease, falling is a very serious problem among older adults and even the most well-intended fall prevention trainings can’t stop accidents from occurring.
So even though you probably already integrate fall prevention into your daily treatment sessions (here is a great fall prevention bingo game you can play with your patients in group sessions), let’s shift our focus from fall prevention to fall recovery occupational therapy.
Why do we want older adults to learn fall recovery?
Simple.
The less time they spend on the floor, the less likely they are to develop certain complications such as dehydration, malnutrition, or other medical conditions that come from being stranded on the floor. Plus, teaching older adults the movements that come with fall recovery provides increased postural stability, strength, and flexibility for other daily tasks.
In addition to these activities, I always incorporate the backward-chaining method (we dive into this fall recovery technique step-by-step and can print off the guide here in the OT Flourish Membership). In addition, always check to make sure your fellow PT is not addressing this area in order to avoid duplication of services!
Who is the appropriate for fall prevention and recovery training?
I hope you realize that we shouldn’t just put a patient on the floor and expect them to get up on their own! Your patient or client should be basically independent or modified independent in just about every daily living task and in functional mobility. As the OT, you should only have to provide up to 1-person minimal assist to get your client to and from the ground.
Clients with paraplegia or bilateral lower extremity amputations can participate if they are already completing transfers in and out of their wheelchairs independently. Practice extreme caution with clients who have heart or respiratory conditions.
Basic Materials
- A large floor mat
- A therapy table or a sturdy bed
- Antiseptic wipes
- Bean bags in a bucket
- A pulse oximeter
- A ring toss game
- A gait belt
- An arm sling
Always spray down and wipe the floor mat dry between uses. Take pulse oximeter readings before and at 10 to 15-minute intervals throughout the training. Make sure your client is wearing a gait belt around their waist in case they get stuck and need some help from you.
Activity 1: Bed Yoga
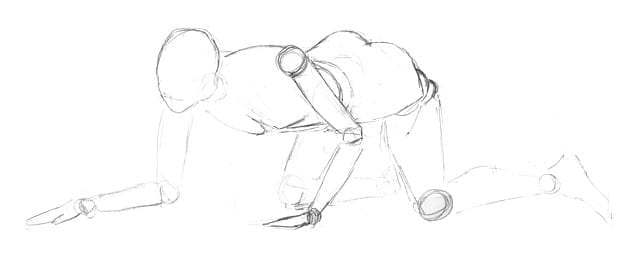
Starting out on the floor might be too intimidating for your client at first, so begin with basic stretches and movements on the bed or on the therapy mat. Take them slowly through a series of motions that you would see when someone is trying to get off of the floor:
- Supine
- Side-lying
- Prone
- Quadruped (on all fours)
- Kneeling
- Reverse and start again
Go through each motion meticulously and gradually, stretching every muscle and joint especially the neck, spine, and hips. It’s alright if this part takes several sessions to get down.
Activity 2: Floor Mat Yoga
It’s the same as bed yoga, but now you add a few steps at the end for a full recovery from the floor:
- Supine
- Side-lying
- Prone
- Quadruped
- Kneeling
- One knee, steadying balance on the bed
- Climb up to the edge of the bed or table
- Sit on the edge of the bed or table
Activity 3: Bean bag recovery
Assist your client down to the center of the floor, on a mat so that they are sitting in an upright position.
- Scatter bean bags, balled up pieces of paper (or whatever you have!) all over the mat, within and beyond reaching distance.
- Place a bucket or wash basin a few feet in front of the mat.
- One at a time, your client has to retrieve each bean bag and toss it into the bucket.
- This will promote scooting, rolling, or any type of movement to get themselves across the floor in a seated position.
This activity is great practice in the event that your client falls and needs to scoot across the floor to retrieve a phone, get to a bed or chair, or access help.
Activity 4: Ring toss recovery
Similarly to the bean bag activity, you can scatter the rings all over the mat and have the client scoot from sitting and toss the rings onto the frame placed in front of them. Or, you can change it up a bit.
Place the rings on one end of the mat and have the client crawl to retrieve each one. Throw a few rings on the chair, table or bed nearby so that the client has to practice climbing. Lastly, have the client retrieve scattered rings from a supine position to facilitate rolling.
Activity 5 (the last and final fall recovery idea!): Recovery with injury
This is a problem-solving activity where you sling or restrain one (and only one) of the client’s limbs and still take them through fall recovery training. There is no fall recovery device involved, but helping them learn to utilize what is available to them after a fall.
You are eliminating a limb due to a mild to moderate injury from a fall (bruise, sprain, possible minor bone fracture or joint displacement). That way, the patient can practice scooting across the floor in order to access the bare minimum help such as retrieving a phone or calling out to someone nearby and not necessarily a full recovery from the floor. You can even incorporate this activity into a bean bag and ring toss retrieval when those activities are getting too simple for the patient.
I also really liked this video on how to get up off the floor using some old school McGuyver style ideas:
Share below what techniques and activities have you used to work on fall recovery?
Post by Meredith D. Chandler, OTR/L, Freelance Content Writer and Mandy Chamberlain MOTR/L

